An API’s performance can be affected by a variety of factors such as inefficient code, network latency, server overload etc, to ensure your API performs adequetly in the real world it is imparative to monitor the latency of your API since an elevated API latency can negatively impact your end-user’s experience and lead to chun. However, there are different ways to improve API performance and reduce the latency such as allocating more resources to the server, implementing caching, reviewing the code etc. In this article we will discuss How to improve API latency through caching with a real world example.
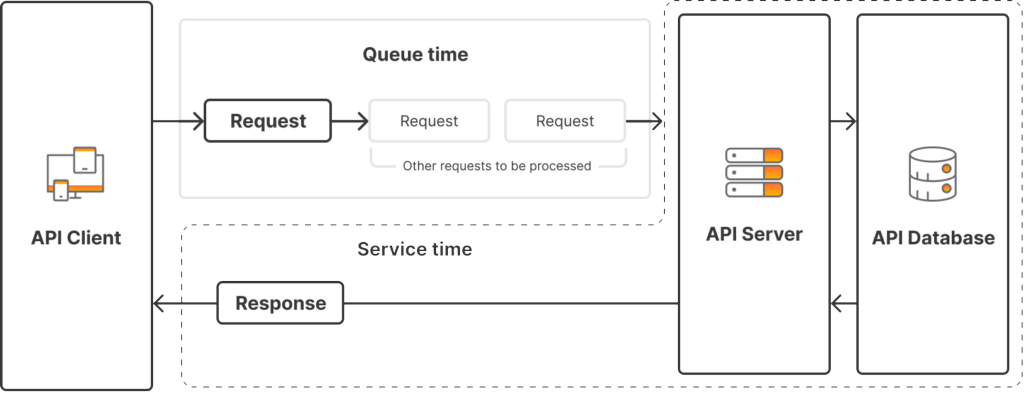
One might wonder what is API Latency? well, API latency is the amount of time an API takes to respond to a request. this time is separated into two namely Queue Time and Service Time.
- Queue time : is the sum of (the time between the start of sending the request from the client and the start of the server processing the request ) and (the time between the end of the server sending the response and the end of the client processing the response)
- Service time : is the time between the start of the server receiving the request and the end of the server sending the response.

In order to implement this technique, we will create one spring boot REST application that will have CRUD operations, then we will apply Redis Cache feature in the Retrieve, Update and Delete Operations. Below is a step by step procedure on how to do so:-
Step #1: Install Redis Server
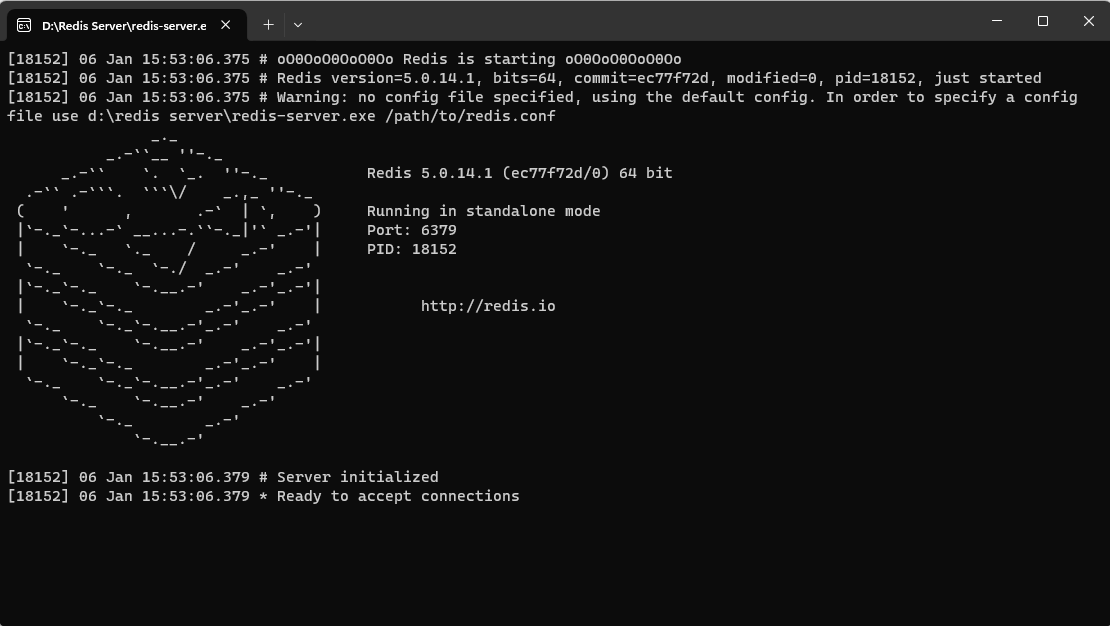
Redis stands for REmote DIctionary Sever, it is an in-memory database that persists on disk and uses key-value data model. Redis can be used as an In-Memory Database, as a Cache or a Message Broker(MQ) in all these usecases redis server instance need to be started to do so we will follow the below steps:-
- Download Redis for windows 5.0.14.1
- Click on the resultant .zip file and extract it to a folder.
- on the extracted folder double click on the redis-server.exe to start Redis Server.

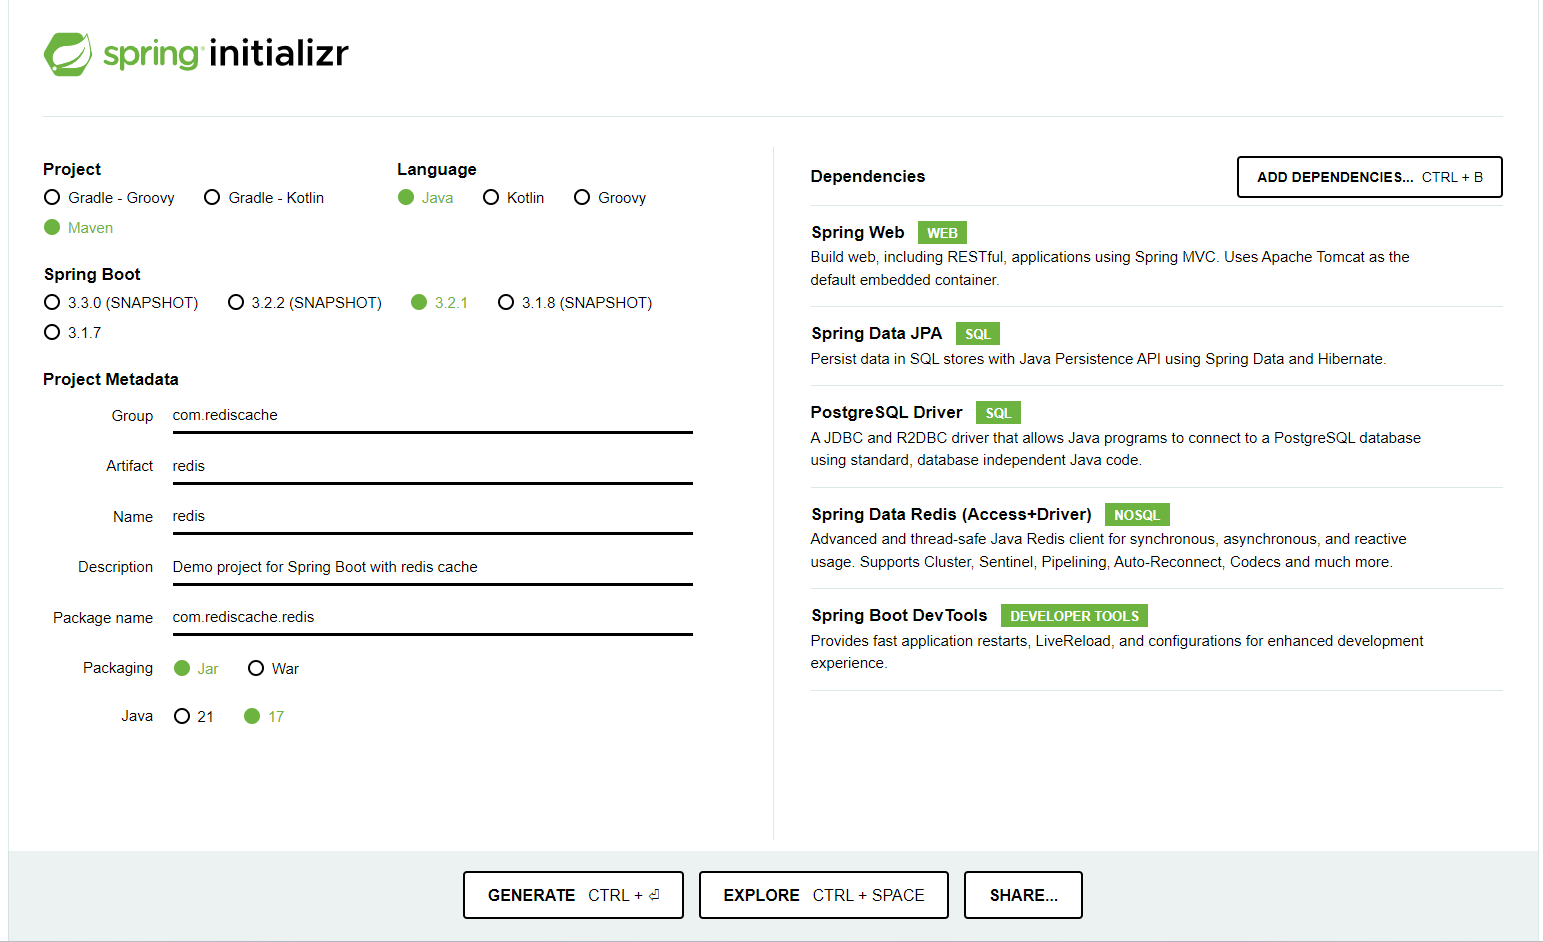
Step #2: Create Spring boot REST application using Spring Initializr
Let’s create a spring boot application using Spring Initializr and add the following dependacies Spring Web, Spring Data JPA, PostgreSQL Driver, Spring Data Redis(Access+Driver) and Spring Boot DevTools.

Step #3: Update application.properies
Update the application properties, to point the datasoource to your database update the database user and password. Update spring cache type and cache null values. your application.propeties file should have the following: -
    logging.level.org.springframework.jdbc.datasource.init.ScriptUtils=debug
    spring.jpa.hibernate.ddl-auto=none

    spring.datasource.url=jdbc:postgresql://localhost:5432/redis_example
    spring.datasource.username=postgres
    spring.datasource.password=password

    spring.cache.type=redis
    spring.cache.redis.cache-null-values=true
Step 4: Create an Entity class as Product.java
Create an entity class Product.java that has a NoArgsContructor, AllArgsConstructor, Getters and Setters, ToString, EqualsAndHashCode and RequiredArgsConstructor
@Data
@NoArgsConstructor
@AllArgsConstructor
@Entity
@Table(name = "products")
public class Product implements Serializable {
    private static final long serialVersionUID = 4L;
    @Id
    @GeneratedValue(strategy = GenerationType.IDENTITY)
    private  Long prodId;
    private String productName;

}
Step 5: Create a repository interface as ProductRepository.java
Create a Repository Interface as ProductRepository.java which extends JpaRepository<Product, Long> as below: -
@Repository
public interface ProductRepository extends JpaRepository<Product, Long> {
}
Step 6: Create Service Interface and implement the service.
In the service layer create an interface ProductService.java and add the methods to be implemented. Create a class ProductServiceImpl.java that implements the above interface. On the implementation of the interface we will add anotations to apply Caching mechanism offered by redis. We will use the following annotations:-
@Cacheable
this annotation is used to enable caching behavior for a method. it is mostly used on retrival methods since once the method demarcated with this annotation is called the method will first check the cache before invoking th method and then caching the result.
@CachePut
this annotation is used to update cache data once data in the database has been altered. A method demarcated with this annotation will always be executed and the result cached.
@CacheEvict
This annotation is used to remove unused or stale data from the cache. it has addition parameters such as value and allEntries that will enable removal of all data with a given value.
@Caching
this annotation is used to combine several annotation as spring boot does not allow multiple annotation of the same type to be declared on a single method. For instance if you want to update both the cached list of products and the ached product with a given key then you could use @Caching to combine the two
    @Caching(
    evict = {@CacheEvict(value = "products", allEntries = true)},
    put   = {@CachePut(value = "product", key = "#product.getProductId()")}
    )
    public User updateProduct(Product product) {
    ....
    }
Below are the annotations as used in our example:-
public interface ProductService {

    public Product saveProduct(Product product);
    public Product updateProduct(Product product, Integer productId);
    public void deleteProduct(Integer productId);
    public Product getProductById(Integer productId);
    public List<Product> getAllProducts();
}
@Service
public class ProductServiceImpl implements ProductService{
    private final ProductRepository productRepository;

    public ProductServiceImpl(ProductRepository productRepository) {
        this.productRepository = productRepository;
    }

    @Override
    public Product saveProduct(Product product) {
        return productRepository.save(product);
    }

    @Override
    @CachePut(value = "product", key="#productId")
    public Product updateProduct(Product product, Long productId) {
        Product oldProduct = productRepository.findById(productId)
                .orElseThrow(() ->new ProductNotFoundException("Product with ID "+productId.toString()+" was not found"));
//        Update the attributes
        oldProduct.setProductName(product.getProductName());
        oldProduct.setUom(product.getUom());
        return oldProduct;
    }

    @Override
    @CacheEvict(value = "product", key="#productId")
    public void deleteProduct(Long productId) {
        Product oldProduct = productRepository.findById(productId)
                .orElseThrow(() ->new ProductNotFoundException("Product with ID "+productId.toString()+" was not found"));
        productRepository.delete(oldProduct);
    }

    @Override
    @Cacheable(value = "product", key="#productId")
    public Product getProductById(Long productId) {
        Product product = productRepository.findById(productId)
                .orElseThrow(() ->new ProductNotFoundException("Product with ID "+productId.toString()+" was not found"));
        return product;
    }

    @Override
    @Cacheable(value = "product")
    public List<Product> getAllProducts() {
        return  productRepository.findAll();
    }
Step 7: Add Caching anotation @EnableCaching at starter class
In order to implement Redis cache on spring boot we will use four annotations: -
@SpringBootApplication
@EnableCaching
public class RedisApplication {

	public static void main(String[] args) {
		SpringApplication.run(RedisApplication.class, args);
	}

}
Step 8: Create RestController class as ProductRestController.java
Finally, create a Rest Controller ProductRestController.java and input the following :
@RestController
@RequestMapping("/api/v1")
public class RedisController {
    private final ProductService productService;

    public RedisController(ProductService productService) {
        this.productService = productService;
    }
    @GetMapping("/getAllProducts")
    public ResponseEntity<List<Product>> getProducts(){
        return ResponseEntity.ok(productService.getAllProducts());
    }
    @GetMapping("/getProductById/{id}")
    public ResponseEntity<Product> getProductById(@PathVariable Long id){
        return ResponseEntity.ok(productService.getProductById(id));
    }
    @PutMapping("/updateProduct/{id}")
    public ResponseEntity<Product> updateProduct(@RequestBody Product product,@PathVariable Long id){
        return ResponseEntity.ok(productService.updateProduct(product,id));
    }
    @DeleteMapping("/deleteProduct/{id}")
    public String deleteProduct(@PathVariable Long id){
        productService.deleteProduct(id);
        return "Product with id: "+id+ " Deleted Successfully !";
    }

}
Step 9: Running your application
To run the application follow the following steps:
- Start the redis server.
- Run your Spring boot aplication.
- Test your endpoints using postman and note the response time of each call you make to measure the API Latency.
Conclusion
After going through How to improve API latency through caching with a practical example, it is important to note that this is only one way to improve latency of your API. There are other techniques to improve the performance of your API. The code used in this article can be found on github here